리눅스 FirewallD 설치 및 데몬 설정

리눅스 FirewallD는 iptables의 체인과 정책이라는 규칙 대신 Zone과 Service를 대신 사용합니다. Firewalld를 사용하는 이유는 iptables의 규칙이 복잡하기 때문에 iptables 대신 사용할 수 있도록 하기 위함입니다.
✅ 리눅스 FirewallD 설치하기
리눅스 서버에 설치 여부를 먼저 확인합니다.
rpm -qa | grep firewalld설치되어 있지 않다면 아무 것도 나오지 않습니다.
# dnf: 록키 리눅스 | yum CentOS
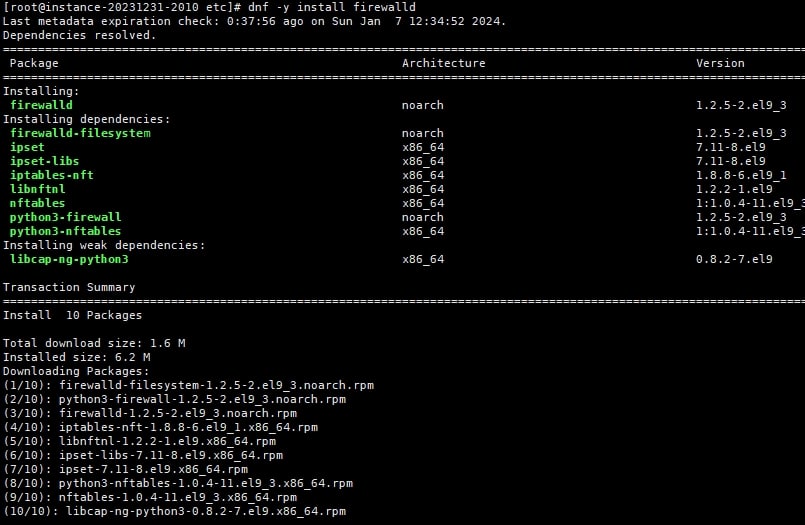
dnf -y install firewalld
Last metadata expiration check: 0:37:56 ago on Sun Jan 7 12:34:52 2024.
Dependencies resolved.
==========================================================================================================================================================================================================
Package Architecture Version Repository Size
==========================================================================================================================================================================================================
Installing:
firewalld noarch 1.2.5-2.el9_3 baseos 446 k
Installing dependencies:
firewalld-filesystem noarch 1.2.5-2.el9_3 baseos 8.2 k
ipset x86_64 7.11-8.el9 baseos 42 k
ipset-libs x86_64 7.11-8.el9 baseos 69 k
iptables-nft x86_64 1.8.8-6.el9_1 baseos 185 k
libnftnl x86_64 1.2.2-1.el9 baseos 83 k
nftables x86_64 1:1.0.4-11.el9_3 baseos 398 k
python3-firewall noarch 1.2.5-2.el9_3 baseos 348 k
python3-nftables x86_64 1:1.0.4-11.el9_3 baseos 19 k
Installing weak dependencies:
libcap-ng-python3 x86_64 0.8.2-7.el9 appstream 29 k
Transaction Summary
==========================================================================================================================================================================================================
Install 10 Packages
Total download size: 1.6 M
✅ 리눅스 Firewalld 데몬 시작
# firewalld 서비스를 시작
systemctl start firewalld
# firewalld 서비스 중지
systemctl stop firewalld
# firewalld 서비스 활성화(재부팅)
systemctl enable firewalld
# 설정 후 설정 즉시 로드
firewall-cmd --reload

### firewalld 방화벽 상태 확인 ###
systemctl status firewalld
## 상태 조회 중 메시지 확인 시 AllowZoneDrifting가 yes로 설정되어 있는 경우 나오는 메시지
WARNING: AllowZoneDrifting is enabled. This is considered an insecure configur...t now.
vi /etc/firewalld/firewalld.conf
AllowZoneDrifting=yes
no로 해 두는 것이 좋다는..
systemctl firewalld restart ✅ firewalld zone 설정 확인
# 기본 설정 ZONE 확인
~]# firewall-cmd --get-default-zone
publi
# 네트워크 인터페이스에서 사용하는 영역 확인
firewall-cmd --get-active-zones
public
  interfaces: eth0
# 특정 영역의 모든 구성 확인
firewall-cmd --zone=public --list-all
public (active)
  target: default
  icmp-block-inversion: no
  interfaces: eth0
  sources:
  services: cockpit dhcpv6-client ssh
  ports:
  protocols:
  forward: yes
  masquerade: no
  forward-ports:
  source-ports:
  icmp-blocks:
  rich rules:
# 모든 영역의 모든 구성 확인
firewall-cmd --list-all-zones
 firewall-cmd --list-all-zones
block
  target: %%REJECT%%
  icmp-block-inversion: no
  interfaces:
  sources:
  services:
  ports:
  protocols:
  forward: yes
  masquerade: no
  forward-ports:
  source-ports:
  icmp-blocks:
  rich rules:

dmz
  target: default
  icmp-block-inversion: no
  interfaces:
  sources:
  services: ssh
  ports:
  protocols:
  forward: yes
  masquerade: no
  forward-ports:
  source-ports:
  icmp-blocks:
  rich rules:

drop
  target: DROP
----- 이하 생략 -----
✅ firewalld zone 설정하기
1. 포트 설정
# 포트 허용하기: 임의 3391 포트 허용 및 거부 | permanent(영구적인)로 영구 설정
firewall-cmd --zone=public --add-port=3391/tcp
firewall-cmd --zone=public --add-port=3391/tcp --permanent

firewall-cmd --zone=public --remove-port=3391/tcp --permanent
# 설정 후 설정 즉시 로드
firewall-cmd --reload
# 설정된 포트 보기
firewall-cmd --zone=public --list-ports
2. IP 설정
### IP대역에 대해 방화벽 해제하기
# 추가(접근 허용) 하기
firewall-cmd --permanent --add-source=192.168.0.0/24
# 제거하기
firewall-cmd --permanent --remove-source=192.168.0.0/24
## 특정 IP 접근 허용
sudo firewall-cmd --permanent --add-rich-rule='rule family="ipv4" source address=210.192.3.118 reject'
sudo firewall-cmd --permanent --add-rich-rule='rule family="ipv4" source address==210.192.3.118 drop'
# 설정된 방화벽 리스트 보기
firewall-cmd --zone=public --list-all
public (active)
  target: default
  icmp-block-inversion: no
  interfaces: eth0
  sources:
  services: cockpit dhcpv6-client ssh
  ports: 3391/tcp
  protocols:
  forward: yes
  masquerade: no
  forward-ports:
  source-ports:
  icmp-blocks:
  rich rules:
	rule family="ipv4" source address="192.168.0.0/24" port port="8000" protocol="tcp" accept
3. http, https 서비스 추가 및 해제
# 서비스 추가
sudo firewall-cmd --permanent --add-service=http
sudo firewall-cmd --permanent --add-service=https
# 서비스 해제
sudo firewall-cmd --permanent --remove-service=http
sudo firewall-cmd --permanent --remove-service=http
리눅스 FirewallD 설치 및 운영 방법에 대해 간단히 알아 봤습니다.