리눅스 Rsync 명령어

Rsync (Remote Sync) 는 네트워크를 통해 파일과 디렉터리를 효율적으로 동기화하는 백업 방식입니다.
전체 데이터를 매번 복사하는 대신 변경된 부분만 증분 방식으로 전송하여 빠르고 안정적인 동기화를 지원합니다.
또한 다양한 옵션을 통해 압축, 암호화, 권한 유지, 삭제 동기화 등 세밀한 제어가 가능하며, 백업과 서버 간 데이터 전송에 널리 사용됩니다. 특히 네트워크 대역폭을 절약하고, 재 전송 부담을 줄여 대규모 데이터 이전에 적합합니다.
✅ 리눅스 rsync 설치 및 리모트 설정하기
1. rsync 패키지 설치 여부 확인
~]# rpm -qa | grep rsync2. 패키지가 없을 경우 설치 진행
yum -y install rsync
dnf -y install rsync
apt-get install rsync

# 록키 리눅스 9 이상에서는 rsync-daemon 데몬 설치가 필요함.
dnf  -y install rsync-daemon
Last metadata expiration check: 3:38:37 ago on Sat Jan 27 13:41:19 2024.
Dependencies resolved.
=========================================================================================================================================================
 Package                               Architecture                    Version                                  Repository                          Size
======================================================================================================
----- 생략 -----

록키리눅스 9 이상의 버전부터 xinetd 버전이 사용되지 않기 때문에 systemd 소켓 서비스를 설정해야 합니다.

~]# systemctl status rsyncd
○ rsyncd.service - fast remote file copy program daemon
     Loaded: loaded (/usr/lib/systemd/system/rsyncd.service; disabled; preset: disabled)
     Active: inactive (dead)

~]#  systemctl start rsyncd
~]# systemctl enable rsyncd
~]# systemctl status rsyncd
● rsyncd.service - fast remote file copy program daemon
     Loaded: loaded (/usr/lib/systemd/system/rsyncd.service; enabled; preset: disabled)
     Active: active (running) since Sat 20xx-01-27 17:21:09 UTC; 2s ago
   Main PID: 6883 (rsync)
      Tasks: 1 (limit: 10823)
     Memory: 688.0K
        CPU: 2ms
     CGroup: /system.slice/rsyncd.service
             └─6883 /usr/bin/rsync --daemon --no-detach
3. rynsc 설정 파일 작성
~]# vi /etc/rsyncd.conf
## 초기 설정 화면
# /etc/rsyncd: configuration file for rsync daemon mode

# See rsyncd.conf man page for more options.

# configuration example:

# uid = nobody
# gid = nobody
# use chroot = yes
# max connections = 4
# pid file = /var/run/rsyncd.pid
# exclude = lost+found/
# transfer logging = yes
# timeout = 900
# ignore nonreadable = yes
# dont compress   = *.gz *.tgz *.zip *.z *.Z *.rpm *.deb *.bz2

# [ftp]
#        path = /home/ftp
#        comment = ftp export area

## 설명 ##
log file = /var/log/rsync.log            # 로그 파일 경로
[source]                                 # 부르고 싶은 명칭
path = /var/www/omeka1/files             # 소스 디렉토리 설정
uid = root                               # rsync 사용 가능한 사용자
gid = root                               # rsync 사용 가능한 그룹
use chroot = yes                         # chroot 사용여부
host allow = x.x.x.x                     # 연결한 호스트: 해당 호스트 아이피만 접근 가능
max connection = 100                     # 최대 연결 개수
timeout 300                              # 타임아웃 시간 설정(초)

### 설정 예시 ###
[myhome]
path=/home
uid = root
gid = root
use chroot = yes
read only = yes
hosts allow = 222.222.123.123
max connections = 3
timeout 30

[dbdata]
path=/var/lib/mysql/
uid = root
gid = root
use chroot = yes
read only = yes
hosts allow = 222.222.123.123
max connections = 3
timeout 30
## 설정 예시 ###
✅ 록키 리눅스 포함 8이하 버전 xinetd 데몬 설치 및 구동
yum -y install xinetd
dnf -y install xinetd
apt-get install rsync

# 등록된 서비스를 확인
systemctl list-unit-files --type=service vi /etc/xinetd.d/rsync
service rsync
{
disable = no
flags = IPv6
socket_type = stream
wait = no
user = root
server = /usr/bin/rsync
server_args = --daemon
log_on_failure += USERID
#xinetd 데몬 재구동
service xinetd restart✅ 방화벽 포트 규칙 추가
iptables 포트 규칙을 추가합니다.
~]# vi /etc/sysconfig/iptables

-A INPUT -m state --state NEW -m tcp -p tcp --dport 873 -j ACCEPT
-A INPUT -m state --state NEW -m udp -p udp --dport 873 -j ACCEPT

servicie iptables restart
방화벽을 오픈했지만 연결이 안될 경우 SeLinux를 중지합니다.
✅ 리눅스 Rsync 명령어 옵션
기본 사용 방법은 다음과 같습니다.
rsync -옵션 [백업할원본주소:경로] [백업받을경로]
rsync -옵션 [SOURCE] [DESTINATION]
rsync -옵션 [[USER]@[HOST]:[PATH] [TARGET]✅ rsync 명령어 사용 예시: 디렉토리 복사 및 동기화
-avh 옵션 중 -a 옵션은 필수 옵션인 디렉토리 복사와 동기화를 진행할 수 있게 해 줍니다.
1. 로컬에서 로컬로 복사
rsync -avh /home/testuser /backup/home2. 로컬에서 리모트로 복사
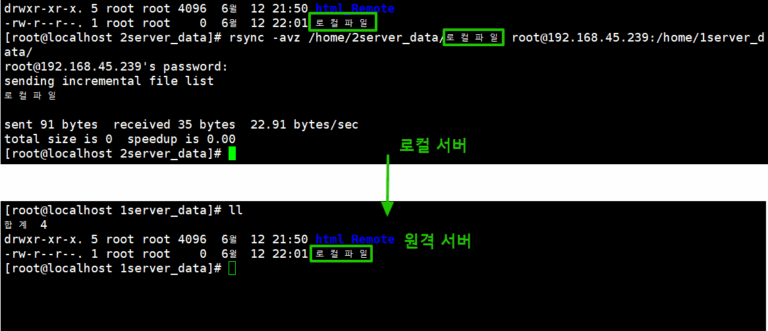
rsync -avh /home/testuser remote_user@remotehost:/home/
## SSH 포트 번호가 다른 경우
rsync -avh -e "ssh -p 123" /home/testuser remote_user@remotehost:/home/
3. 리모트에서 로컬로 가져오기
rsync -avh remote_user@remotehost:/home/testuser /home/testuser