CentOS 7 Nginx 설치 | PHP & MariaDB 설치

VritrualBox에 CentOS 7 Nginx 설치를 진행해 보겠습니다. 추가로 PHP 설치 후 PHP-FPM 설정을 같이 진행합니다.
✅ CentOS 7 Nginx 설치
epel 저장소 설치 후 nginx 저장소를 추가합니다.
yum -y install epel-release

# /etc/yum.repos.d/nginx.repo
[nginx-stable]
name=nginx stable repo
baseurl=http://nginx.org/packages/centos/$releasever/$basearch/
gpgcheck=1
enabled=1
gpgkey=https://nginx.org/keys/nginx_signing.key

[nginx-mainline]
name=nginx mainline repo
baseurl=http://nginx.org/packages/mainline/centos/$releasever/$basearch/
gpgcheck=1
enabled=0
gpgkey=https://nginx.org/keys/nginx_signing.keyCentOS 7에서 기본 패키지 설치로 stable 버전 설치를 진행합니다.
yum  install -y nginx
nginx -v
nginx version: nginx/1.26.1
기능 테스트 등의 사용 목적으로 최신 버전의 설치가 필요한 경우
yum-config-manager --enable nginx-mainline✅ php 설치
yum -y install yum-utils
yum -y install https://rpms.remirepo.net/enterprise/remi-release-7.rpm
설치 가능한 php 버전을 외부 저장소에서 조회합니다.
yum --enablerepo=remi-safe list php*설치할 PHP 버전을 활성화 후 설치를 진행합니다.
yum-config-manager --enable remi-php83

yum info php
Loaded plugins: fastestmirror
Loading mirror speeds from cached hostfile
 * epel: d2lzkl7pfhq30w.cloudfront.net
 * remi-php83: mirrors.tuna.tsinghua.edu.cn
 * remi-safe: mirrors.tuna.tsinghua.edu.cn
remi-php83                                                                                        | 3.0 kB  00:00:00
remi-php83/primary_db                                                                             | 179 kB  00:00:01
Available Packages
Name        : php
Arch        : x86_64
Version     : 8.3.8
Release     : 1.el7.remi
Size        : 2.1 M
Repo        : remi-php83
설치했던 yum-utils 설치 시 설치된 config-manager를 사용하여 설치할 php 버전을 설정합니다.
yum install -y php php-mbstring php-cli php-fpm php-mysqlnd php-xml- php-mbstring : 다국어 문자열 처리, 한글 등 필요 시
- php-fpm : FastCGI Process Manager, nginx와 연동용
- php-cli :커맨드라인용, 관리 및 테스트 용도
- php-mysqlnd :MySQL/MariaDB 연동용 네이티브 드라이버
- php-xml :XML 처리용, 워드프레스 등 많이 필요
php 버전 확인.
php -v
PHP 8.3.8 (cli) (built: Jun  4 2024 14:53:17) (NTS gcc x86_64)
Copyright (c) The PHP Group
Zend Engine v4.3.8, Copyright (c) Zend Technologies
✅ Nginx 설정
🔲 방화벽 http 허용 설정
firewall-cmd --add-service=http --permanent
firewall-cmd --reload
firewall-cmd --list-ports
22/tcp
🔲 /etc/nginx/nginx.conf 설정 확인
user  nginx;   # nginx 프로세스 실행 사용자
worker_processes  auto; # cpu 코어 수에 따라 자동 설정

error_log  /var/log/nginx/error.log notice;
pid        /var/run/nginx.pid;

# 최대 동시 연결 수
events {
    worker_connections  1024;
}
🔲 user.conf 설정
default.conf 파일 user.conf로 복사 후 설정을 기존 내용을 모두 지우고 아래의 내용을 적용합니다.
cd /etc/nginx/conf.d/
cp default.conf user.conf
vi user.conf
server {
# 1. HTTP 포트 80으로 리스닝
listen 80;
# 2. 요청을 받을 도메인 이름 (서버 이름)
server_name mydomain.com;
# 3. 웹 문서 루트 디렉토리 설정
root /home/testuser/www;
# 4. 기본 인덱스 파일 설정
index index.html index.htm index.php;
# 5. 문자 인코딩 UTF-8 설정
charset utf-8;
# 6. 정적 파일 처리
location / {
# 요청된 파일이 있으면 그 파일, 디렉터리이면 index 파일, 없으면 404 반환
try_files $uri $uri/ =404;
}
# 7. PHP 파일 처리 설정
location ~ \.php$ {
# fastcgi 설정 파일 포함 (필수 파라미터들 포함)
include fastcgi_params;
# PHP 요청을 FastCGI (PHP-FPM) 서버로 전달
fastcgi_pass 127.0.0.1:9000;
# 기본 인덱스 파일 설정
fastcgi_index index.php;
# 실제 PHP 파일 경로를 FastCGI에 전달
fastcgi_param SCRIPT_FILENAME $document_root$fastcgi_script_name;
}
}php-fpm 설정 변경 내용
- home/testuser/www;
- /scripts$fastcgi_script_name; > $document_root$fastcgi_script_name;
웹 접속 시 403 에러가 발생하기 때문에 호스트 계정 폴더의 퍼미션을 755로 수정 및 SELinux를 비활성화 합니다.
chmod 755 /home/testuser/etc/selinux/config 파일에서 SELINUX=disabled 설정을 진행했습니다. source 명령어 반영은 안되고 재부팅 시에만 적용되는 것으로 확인했습니다.
nginx 시작 및 php-fpm 시작을 진행합니다.
systemctl start nginx
systemctl enable nginx
systemctl status nginx
systemctl start php-fpm
systemctl enable php-fpm
systemctl status php-fpm
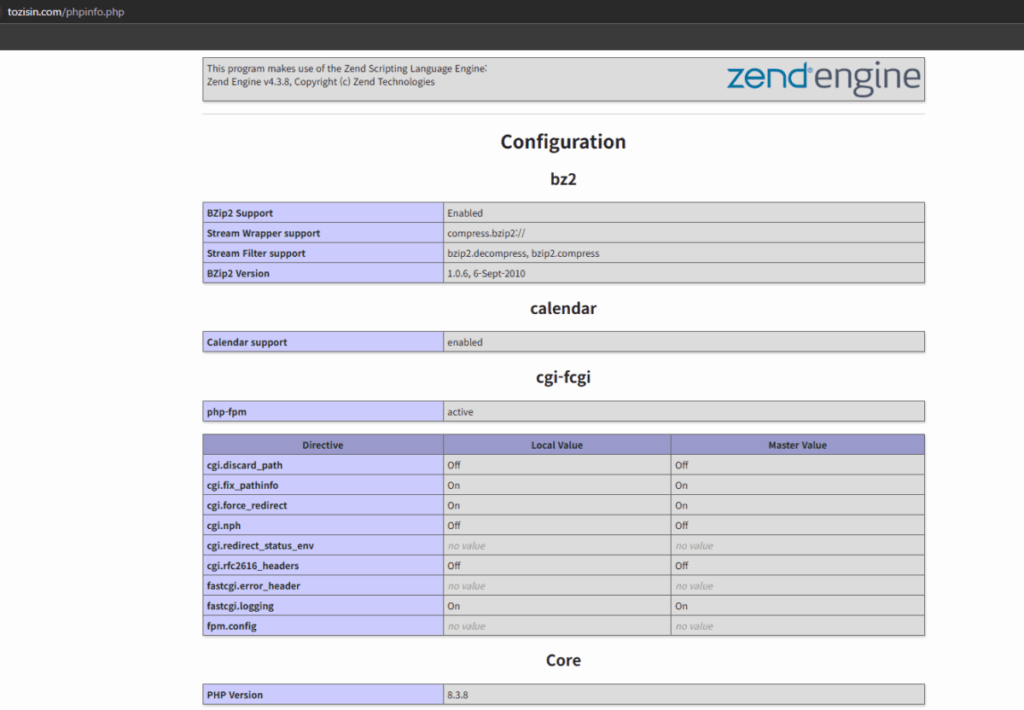
🔲 PHP_FPM 연동 테스트 테스트
루트 폴더 경로에 phpinfo.php 생성
vi phpinfo.php

<?php phpinfo(); ?>
php-fpm 구동까지 웹 접속 후 확인합니다.
✅ MariaDB 설치
MariaDB 기본 설치를 진행할 경우 예전 버전의 MariaDB 버전이 설치됩니다.(CentOS 7에서 공식적으로 안정 지원되는 MariaDB 버전은 최대가 10.x 대입니다.)
먼저 저장소를 생성합니다.
vi /etc/yum.repos.d/MariaDB.repo[mariadb]
name = MariaDB
# rpm.mariadb.org is a dynamic mirror if your preferred mirror goes offline. See https://mariadb.org/mirrorbits/ for details.
# baseurl = https://rpm.mariadb.org/10.11/rhel/$releasever/$basearch
baseurl = https://mirrors.xtom.jp/mariadb/yum/10.11/rhel/$releasever/$basearch
module_hotfixes = 1
# gpgkey = https://rpm.mariadb.org/RPM-GPG-KEY-MariaDB
gpgkey = https://mirrors.xtom.jp/mariadb/yum/RPM-GPG-KEY-MariaDB
gpgcheck = 1
yum 캐시 초기화 및 재설정을 합니다.
yum clean all
yum makecache
활성화 된 저장소를 확인합니다.
yum info mariadb
yum list available | grep -i mariadb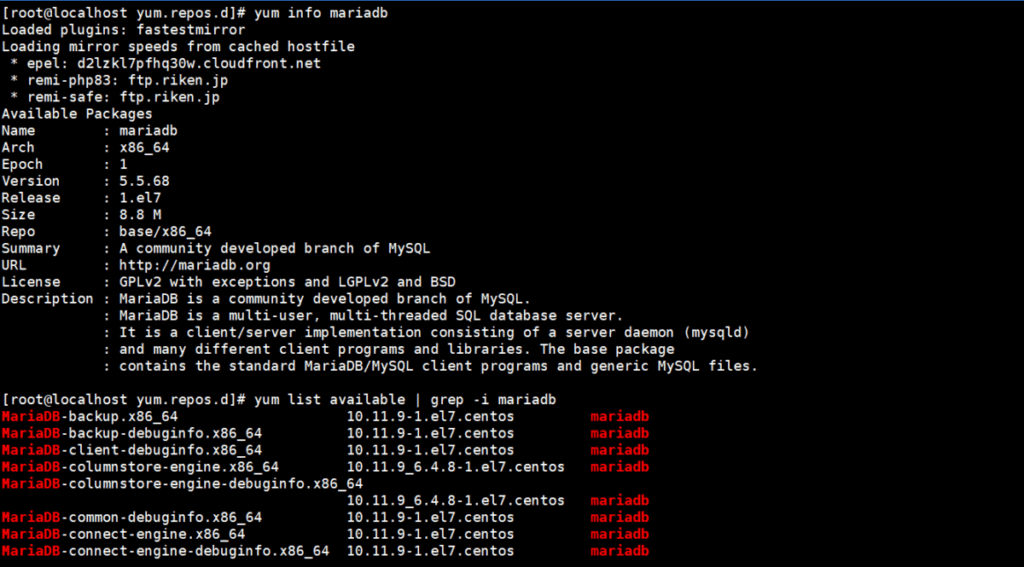
yum install maradb 를 입력하면 구 버전의 ‘mariadb-server’, ‘mariadb-client’가 설치되니 아래와 같이 명령어를 입력합니다.
yum install -y mariadb-server mariadb-client설치된 버전을 확인합니다.
mariadb -V
mariadb  Ver 15.1 Distrib 10.11.9-MariaDB, for Linux (x86_64) using readline 5.1
mariaDB 시작 및 활성화를 진행합니다.
systemctl start mariadb
systemctl enable mariadb