테스트 환경디지털오션|Ubuntu 24.04 (LTS) x64|Singapore SGP1|Basic Regular $6/mo
VPS 서버 생성 작업 확인
디지털오션(DigitalOcean)은 Droplet이라는 이름의 가상 서버(VPS)를 쓴 시간만큼 요금을 매겨 빌려 주는 클라우드 서비스입니다. 처음 VPS를 만드는 사람 기준으로 가입과 결제 수단 등록을 마치고, Ubuntu 24.04 LTS와 월 6달러 요금제로 Droplet을 만들어 접속 주소를 받는 데까지 2026년 11월 5일 제어판 화면 그대로 따라갔습니다.
Droplet 만들기 첫 화면에는 월 32달러 요금제가 기본으로 골라져 있어, 요금제를 직접 바꾸지 않으면 연습용으로는 큰 서버가 만들어집니다. 다 쓴 서버는 지워야 요금이 멈추므로, 지우는 순서까지 함께 확인합니다.
준비가입에 쓸 Google 계정(또는 GitHub 계정이나 이메일 주소)과 결제에 쓸 카드나 PayPal 계정
TOC
15mn read
TOC
15mn read
View more
1️⃣ 디지털오션 가입
📍 어디서: 디지털오션 가입 페이지(브라우저) → 가입 뒤 첫 대시보드
가입 화면에서 Google, GitHub, 이메일 가운데 하나를 고릅니다. 이번에는 Google 계정으로 가입했습니다.
가입을 마치면 [Welcome aboard!] 첫 대시보드가 열립니다. 왼쪽에는 PROJECTS와 CORE CLOUD 같은 메뉴가 있고, 아래 [Finish your onboarding]에는 [Add a Payment Method] 한 줄이 남아 있습니다.
가입 화면에는 크레딧 안내가 따로 없고, 가입을 마치면 화면 위에 [Signup Credit: $5.00]이 보입니다. 파란 띠에는 Inference Cloud(AI 모델을 실행하는 상품)에 쓰는 $5.00 무료 크레딧 안내가 나옵니다. 서버인 Droplet을 만들려면 결제 수단부터 등록합니다.
2️⃣ 디지털오션 결제 수단
📍 어디서: 디지털오션 제어판(브라우저)
첫 대시보드의 [Add a Payment Method]를 누르면 결제 수단 창이 열리고, 카드나 PayPal을 고른 뒤 청구지 정보를 채웁니다. PayPal은 연결할 때 $5.00을 한 번 미리 결제하고, 이 금액은 선결제(Prepayments)로 남아 앞으로 나올 요금에서 먼저 빠집니다.
등록이 끝나면 왼쪽 메뉴 [ACCOUNT › Billing]에서 금액을 확인할 수 있습니다. PayPal로 낸 $5.00은 [Prepayments]와 [Remaining prepayments]에 나오고, 아직 서버를 만들기 전이라 [Total usage]는 $0.00입니다.
Billing 화면 맨 위에는 이 페이지 정보가 하루에 한 번 갱신된다는 안내가 있습니다. 서버를 만든 직후 금액이 바로 늘지 않아도 정상이므로, 다음 날 다시 열어 쓴 금액을 확인합니다.
3️⃣ 디지털오션 프로젝트
📍 어디서: 디지털오션 제어판(브라우저)
프로젝트는 서버와 데이터베이스 같은 자원을 묶어 관리하는 폴더입니다. 가입하면 [first-project]가 저절로 만들어져 왼쪽 메뉴 [PROJECTS] 아래에 나오므로, 처음 서버 한 대를 만들 때는 새 프로젝트를 만들지 않고 그대로 사용합니다.
first-project에 첫 서버를 넣을 때는 화면 위 파란 [Create] 버튼을 눌러 펼친 메뉴에서 [CORE CLOUD › Droplet]을 고릅니다. 메뉴 위쪽에는 AI 상품 묶음이 먼저 나오므로, 아래 CORE CLOUD 묶음까지 내려가 찾습니다.
4️⃣ DigitalOcean Droplet 만들기
📍 어디서: 디지털오션 제어판(브라우저) · SSH 키 만들기만 내 PC
[Create Droplet] 화면은 위에서부터 지역, 이미지, 요금제, 인증 방식, 이름 칸이 차례로 이어지고, 오른쪽 [Summary]에 고른 내용과 월 요금이 따라 나옵니다.
🔲 데이터센터 지역
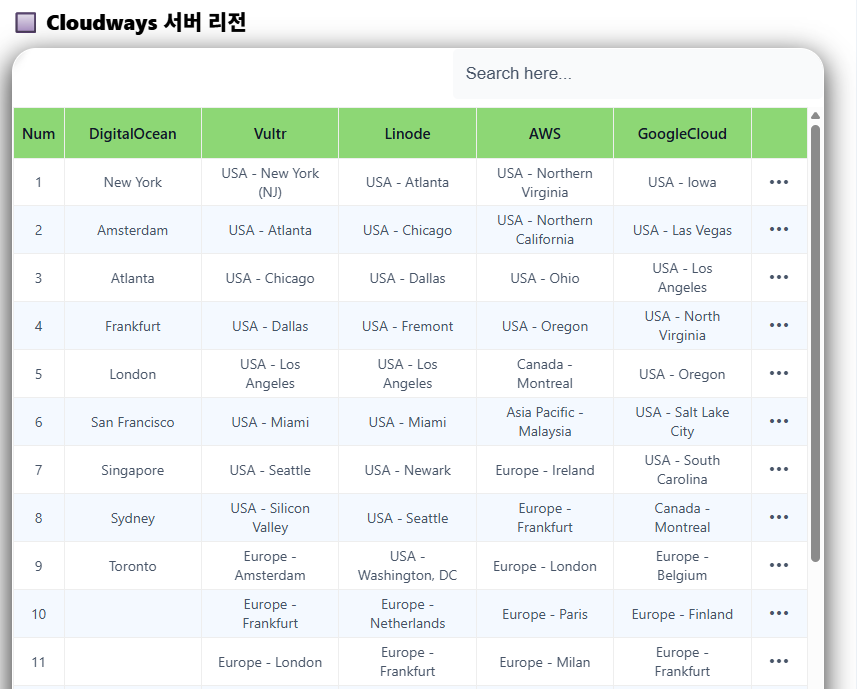
지역은 서버가 실제로 놓이는 데이터센터 위치입니다. 이번 화면에는 [Singapore • Datacenter 1 • SGP1]이 처음부터 골라져 있었습니다. 기본 지역은 열 때마다 다를 수 있으므로, 펼침 칸에서 방문자가 많은 곳과 가까운 지역을 직접 고릅니다.
DigitalOcean데이터센터 18곳 · 도시 13곳 · 4개 지역Datacenters 18 · Cities 13 · Regions 4
지역Region
DigitalOcean 제어판 · 공식 문서 기준 · 2026-11DigitalOcean control panel · official docs · 2026-11
🔲 Ubuntu 이미지
이미지는 서버에 처음 설치되는 운영체제입니다. [OS] 탭에서 [Ubuntu]를 고르고 버전 칸이 [24.04 (LTS) x64]인지 확인합니다. LTS는 오랜 기간 보안 업데이트를 받는 장기 지원 버전이라 처음 운영하는 서버에 맞습니다.
🔲 Droplet 요금제
Create Droplet 첫 화면의 [Summary]에는 $32.00/mo가 나옵니다. [Basic] 탭에 [Premium Intel] CPU의 2 vCPU, 4 GB 메모리 요금제가 기본으로 골라져 있기 때문입니다. vCPU는 서버에 할당되는 가상 CPU 코어 수입니다. 연습용 서버라면 이 요금제를 그대로 두지 않고 아래에서 바꿉니다.
[CPU Options]에서 [Regular]를 고르면 SSD 디스크를 쓰는 요금제가 $4.00/mo부터 나옵니다. 가장 작은 $4 요금제는 1 vCPU, 512 MB 메모리, 10 GB SSD, 전송량 500 GB입니다.
이번에는 한 단계 위인 $6.00/mo 요금제(1 vCPU, 1 GB 메모리, 25 GB SSD, 전송량 1000 GB)를 골랐습니다. [Summary]에 함께 나오는 $0.009/hour가 시간 요금입니다. Droplet 요금은 만든 순간부터 쓴 시간만큼 쌓이고, 한 달에 672시간(28일)을 넘으면 더 늘지 않습니다. 하루 이틀 시험하고 지우면 그 시간만큼만 청구됩니다.
🔲 백업과 추가 옵션
요금제 아래 [Add additional storage]는 디스크를 따로 더 붙이는 칸이고, [Backups]의 [Enable automated backups]를 켜면 복원할 수 있는 백업 크기만큼 요금이 추가됩니다. 처음 만드는 연습 서버라면 둘 다 꺼 둔 채 넘어갑니다.
🔲 SSH 키 인증
[Authentication]은 서버에 처음 들어갈 방법을 정하는 칸이며, [SSH Keys]와 [Password] 두 탭이 있습니다. SSH 키는 비밀번호 대신 쓰는 열쇠 파일 한 쌍으로, 내 PC에 남기는 개인 키와 서버에 올리는 공개 키로 이루어집니다. [Add an SSH Key] 버튼을 누르면 공개 키를 붙여 넣는 창이 열립니다.
창 오른쪽에는 키가 아직 없는 사람을 위한 생성 순서가 나옵니다.
🖥️ 터미널에서 하는 일
SSH 키가 아직 없다면 내 PC의 PowerShell(윈도우)이나 터미널(macOS, 리눅스)에서 [ssh-keygen] 명령으로 키 한 쌍을 만듭니다. 디지털오션 창 오른쪽 [Generating an SSH key pair]에도 PowerShell을 관리자 모드가 아닌 일반 모드로 열어 같은 명령을 실행하라고 나옵니다.
만든 뒤에는 이름이 .pub로 끝나는 공개 키 파일의 내용만 [SSH Key content] 칸에 붙여 넣고, 짝이 되는 개인 키 파일은 내 PC에만 둡니다.
공개 키를 붙여 넣은 뒤 [Give your SSH Key a name] 칸에 알아보기 쉬운 이름을 적고 [Add SSH Key]를 누릅니다.
등록한 키는 인증 칸 목록에 나오며, 키 줄에 체크해야 오른쪽 [Create Droplet] 버튼이 눌리는 상태로 바뀝니다. 그 아래 [Networking]의 [Public IPv4 address]는 처음부터 체크되어 있어, 인터넷에서 이 서버로 들어오는 주소인 IPv4가 붙습니다.
🔲 Droplet 이름과 생성
[Additional Options]의 Managed Database($15.00/month)도 꺼 둔 채 넘어갑니다. [Quantity]는 1로 두고, [Give your Droplet a name]에 서버 이름을 적습니다. 이름에는 영문과 숫자, 대시(-), 마침표만 쓸 수 있으며, 이번에는 do-pm2-test-ubuntu-s-1vcpu-1gb-sgp1로 정했습니다.
[Finalize]의 [Select a project]가 [first-project]인지 확인하고 오른쪽 [Create Droplet]을 누르면 서버 만들기가 시작됩니다. 요금도 이때부터 쌓이므로 요금제와 지역을 한 번 더 확인한 뒤 누릅니다.
아래 시뮬레이터에서는 지역부터 이름까지 같은 칸을 차례로 눌러 보며, 실제 서버를 만들기 전에 Create Droplet 화면을 미리 익힐 수 있습니다.
🔲 디지털오션 Droplet 만들기 시뮬레이터
위쪽 [Create]를 열고 CORE CLOUD 아래 [Droplet]을 누릅니다.
Droplet을 둘 데이터센터 지역을 고릅니다.
OS 탭에서 배포판과 버전을 고릅니다.
CPU Options와 월 요금제를 고르면 오른쪽 Summary가 바뀝니다.
추가 저장 공간과 자동 백업을 켜면 Summary에 요금 줄이 붙습니다.
[Add an SSH Key]로 공개 키를 넣은 뒤 키 줄을 체크합니다.
공개 IPv6와 모니터링 에이전트를 켜거나 끕니다.
추가 옵션, 수량, 이름, 프로젝트를 정합니다.
키를 체크하면 [Create Droplet]이 진해지고, 누르면 만들기가 시작됩니다.
만들기가 끝나면 상세 화면이 Active로 바뀌고 IP 주소가 나옵니다.
📍
Search resources, pages, or public IP (Ctrl+K)
DocumentationStatus PageContact SupportCommunity
Latest UpdatesNEW Now Available: Kimi K3.1 Pro from Moonshot AIMoonshot AI’s Kimi K3.1 Pro is now available on DigitalOcean Inference Engine, a post-…NEW Now Generally Available: Microsoft Entra ID SSO for TeamsTeam single sign-on (SSO) now supports Microsoft Entra ID, alongside Okta. If your…NEW Now in Public Preview: Secrets ManagerCreate, store, and manage application secrets — including API keys, database credentials,…Powered by Canny · RSSSee all changes
CORE CLOUD
☆ Star your favorite
Droplets
Create an Autoscale Pool
Search by droplet name
NAMESTATUSIP ADDRESSCREATED ▲TAGS
Take the stress out of unpredictable trafficAutoscale pools can help you maintain stability and cost by only scaling your resources as you need them
Automatically scaleAutomatically scale up and down based on a target you set either CPU, RAM or both.
Easily reconfigure without downtimeUpdate your Droplets, then we’ll remove the old ones so you don’t experience downtime.
No additional feesJust the cost of the Droplets that are running in the pool, thats it.
Create Droplet
Choose a datacenter region
North America
Europe
Asia
Australia
Choose an image
UUbuntuRECOMMENDED
DDebian13 x64
FFedoraRequires an SSH Key44 x64
CCentOS9 Stream x64
AAlmaLinuxRequires an SSH KeyAlmaLinux 9
RRocky LinuxRequires an SSH Key9 x64
Search Solutions
Explore Solutions ↗
Recommended for you
DDockerMinimum disk size: 25 GBDetails ↗
ccPanel & WHM® for AlmaLinux 9Minimum disk size: 50 GBDetails ↗
OOmarchyMinimum disk size: 80 GBDetails ↗
CCoolifyMinimum disk size: 60 GBDetails ↗
Show more Solutions images
Search Agents
Explore Agents ↗
Recommended for you
HHermes AgentMinimum disk size: 50 GBDetails ↗
OOpenClawMinimum disk size: 80 GBDetails ↗
OOpenCodeMinimum disk size: 25 GBDetails ↗
Show more agents
Upload your own imageCreate a GPU Droplet with any Linux or Unix-like image.Add a Custom Image
Choose configuration type
BundledChoose from a wide range of fixed configurations with balanced hardware ratios. Compute, memory, and storage are bundled into ready-to-deploy plans.
v5Workload-optimized compute, powered by 5th Gen AMD EPYC™ processors, for a new level of performance. Size vCPU, memory, and storage to fit your needs.Up to 30% higher performance
Choose a Droplet Plan
CPU Options
RegularDisk Type: SSD
Premium AMDDisk Type: NVMe SSD
Premium IntelDisk Type: NVMe SSD
ⓘ Basic plans are currently unavailable in your selected region (MKC1)
ⓘ Basic - Premium AMD plans are currently unavailable in your selected region (SGP1)
Select a Plan
$4.00/mo1 vCPU – 512 MB RAM – 10 GB SSD – 500 GB TransferUnavailable in MKC1Available in 11 other regions
$6.00/mo1 vCPU – 1 GB RAM – 25 GB SSD – 1000 GB TransferUnavailable in MKC1Available in 11 other regions
$12.00/mo1 vCPU – 2 GB RAM – 50 GB SSD – 2 TB TransferUnavailable in MKC1Available in 11 other regions
$18.00/mo2 vCPU – 2 GB RAM – 60 GB SSD – 3 TB TransferUnavailable in MKC1Available in 11 other regions
$24.00/mo2 vCPU – 4 GB RAM – 80 GB SSD – 4 TB TransferUnavailable in MKC1Available in 11 other regions
$48.00/mo4 vCPU – 8 GB RAM – 160 GB SSD – 5 TB TransferUnavailable in MKC1Available in 11 other regions
$96.00/mo8 vCPU – 16 GB RAM – 320 GB SSD – 6 TB TransferUnavailable in MKC1Available in 11 other regions
$7.00/mo1 AMD vCPU – 1 GB RAM – 25 GB NVMe SSD – 1000 GB TransferUnavailable in MKC1Available in 11 other regions
$14.00/mo1 AMD vCPU – 2 GB RAM – 50 GB NVMe SSD – 2 TB TransferUnavailable in MKC1Available in 11 other regions
$21.00/mo2 AMD vCPU – 2 GB RAM – 60 GB NVMe SSD – 3 TB TransferUnavailable in MKC1Available in 11 other regions
$28.00/mo2 AMD vCPU – 4 GB RAM – 80 GB NVMe SSD – 4 TB TransferUnavailable in MKC1Available in 11 other regions
Show all plans
$8.00/mo1 Intel vCPU – 1 GB RAM – 35 GB NVMe SSD – 1000 GB TransferUnavailable in MKC1Available in 11 other regions
$16.00/mo1 Intel vCPU – 2 GB RAM – 70 GB NVMe SSD – 2 TB TransferUnavailable in MKC1Available in 11 other regions
$24.00/mo2 Intel vCPU – 2 GB RAM – 90 GB NVMe SSD – 3 TB TransferUnavailable in MKC1Available in 11 other regions
$32.00/mo2 Intel vCPU – 4 GB RAM – 120 GB NVMe SSD – 4 TB TransferUnavailable in MKC1Available in 11 other regions
Show all plans
CPU Options
Regular IntelDisk Type: SSD
Premium IntelDisk Type: NVMe SSD
ⓘ General Purpose plans are currently unavailable in your selected region (SGP1)
Select a Plan
$63.00/mo2 Intel vCPU – 8 GB RAM – 25 GB SSD – 4 TB TransferUnavailable in SGP1Available in 2 other regions
$126.00/mo4 Intel vCPU – 16 GB RAM – 50 GB SSD – 5 TB TransferUnavailable in SGP1Available in 2 other regions
CPU Options
Regular IntelDisk Type: SSD
Premium IntelDisk Type: NVMe SSD
ⓘ CPU-Optimized plans are currently unavailable in your selected region (SGP1)
Select a Plan
$42.00/mo2 Intel vCPU – 4 GB RAM – 25 GB SSD – 4 TB TransferUnavailable in SGP1Available in 2 other regions
$84.00/mo4 Intel vCPU – 8 GB RAM – 50 GB SSD – 5 TB TransferUnavailable in SGP1Available in 2 other regions
CPU Options
Regular IntelDisk Type: SSD
Premium IntelDisk Type: NVMe SSD
ⓘ Memory-Optimized plans are currently unavailable in your selected region (SGP1)
Select a Plan
$84.00/mo2 Intel vCPU – 16 GB RAM – 50 GB SSD – 4 TB TransferUnavailable in SGP1Available in 2 other regions
$168.00/mo4 Intel vCPU – 32 GB RAM – 100 GB SSD – 6 TB TransferUnavailable in SGP1Available in 2 other regions
vCPU size2 vCPUs – $0.0316/hr$0.0158/vCPU
1vCPU2vCPU4vCPU6vCPU8vCPU
Memory4 GB RAM – $0.0162/hr$0.004/GB
2GB4GB6GB
Storage
Boot disks store the operating system and system files. A minimum size of 30 GB is required. We recommend Block Storage Volumes for all other persistent data.
Storage size (GB)10▴▾Monthly cost$1.00 ($0.1/GB per month)
Choose Configuration
Automatically Format & MountWe will choose the appropriate default configurations. These settings can be changed later via ssh.
Choose a filesystem
Manually Format & MountWe will still attach the volume. You can then manually format and mount the volume.
Enter a name*
Can only contain alphanumeric characters, dashes, and periods.
Backups
PlansUsage-Based NEW
Backup Frequency
Weekly BackupsEach backup is kept for 28 days.20% of the cost of the Droplet
Daily BackupsEach backup is kept for 7 days.30% of the cost of the Droplet
Backup Window
Backups will be initiated, but may not complete during the 4 hours window
Day of the weekWednesdayTime of day1:00pm – 5:00pm ●●
Authentication
Add an SSH Key for authentication
An SSH key pair is a more secure way to connect to your Droplet
Create an SSH key for secure, password-free accessWe’ll walk you through it. It’s painless, we promise!
ⓘ Important – Using passwords for authentication in production is not secure. For enhanced security, disable the root password and use SSH keys as soon as your Droplet is created.
Create a root password
Connect to your Droplet as the “root” user via password Root password
Password requirements
Must be at least 10 characters long
Must contain at least 1 uppercase letter (first and last characters don’t count)
Must contain at least 1 number
Cannot end with a number or special character
Networking
Public IP addresses are optional. A private IPv4 address is always assigned for secure internal traffic within the same VPC.
Monitoring
Additional Options
Enter your scripts or dataGuide to using startup scripts ↗
Select Database Engine🍃 MongoDB
Quantity
Deploy multiple Droplets with the same configuration.
1
Quantity disabled while a Managed Database is selected.
Give your Droplet a name
Can only contain alphanumeric characters, dashes, and periods.
Finalize
Select a project
TagsMay contain letters, numbers, colons, dashes, and underscores.
Summary
Total cost
ⓘ Select an image to create this Droplet
ⓘ Select an SSH Key to create this Droplet
ⓘ Public IPv4 introductory pricing is subject to change under the Terms of Service ↗
Want to maximize efficiency and cost?Programmatically manage Droplets in a repeatable and re-usable way with our API. Create via API
✱ Newfirst-project
Insights (last hour)
CPU usage—Memory—
Total Droplet Cost
/ month
/ hour This is an estimation based on current configuration, you can see thecost to date in billing ↗
Droplet
Automated Backups
Reduce the stress of failure with automated droplet backups. They can be used for restoring lost or corrupt data and creating new Droplets.
Setup Automated Backups
Tags
No tags have been added to this droplet.
Edit tags
Most Viewed Droplet Articles
How to Connect to Droplets with SSHHow to add SSH keys to New or Existing DropletsHow do I install an SSL Certificate on a Droplet?How to TroubleShoot Common SSH Issues
Connection Details
You’ll be able to connect after the Droplet finishes creating
Public IPv4
Private IP?
ⓘ Having trouble connecting? Check out our troubleshooting guide
Reserved IP ?Recommended
Checkout why using a reserved IP can help you mitigate against downtimeAdd a Reserved IP ↗
Public IPv6
IPv6 has built-in authentication and privacy support, and making it difficult for hackers to launch scanning attacks.Enable IPv6
Anybody can access the Droplet via these public addresses
Public Gateway: ●●●.●●●.●●●.●●●Netmask: ●●●.●●●.●●●.●●●
Enable IPv6Built-in authentication and privacy support, and makes it difficult for hackers to launch scanning attacks. Requires turning off the Droplet after creation.
⚠ To enabled IPv6, you must first turn off the Droplet.
Enable Reserved IPCheckout why using a reserved IP can help you mitigate against downtime
Private Network
Only other members of the same VPC Network can access the Droplet via its private addressPrivate IP?
VPC network
VPC IP Range: ●●●.●●●.●●●.●●●/20
Firewalls
Looks like you haven’t assigned a firewallDigitalOcean Cloud Firewalls are network-based, so connections never reach your Droplet. They can protect all current and future Droplets and are easier to manage via the UI or API.
Looks like you don’t have any Block storage volumesVolumes are highly available units of block storage that you can attach to a Droplet to increase its space.Add Volume
Reduce the stress of failure with Automated Backups
They can be used for restoring lost or corrupt data and creating new Droplets, without having to worry about scheduling or managing.
Setup Automated Backups
About to make a change? Take a snapshot!
Snapshots are on-demand backups that you can take whenever you want. They can be a great way to restore a recent change that went off the rails.
Activity
NAMEINITIATEDEXECUTION TIME
Create●●
Droplet NameEdit
Resize configurationEdit
Recovery modeUse the Recovery Console if you need to use the recovery ISO or you can’t connect to your Droplet with the Droplet Console. To use the recovery console, you must enable password authentication. If necessary, you can reset your root password below.Edit
Recovery consoleUse the Recovery Console if you need to use the recovery ISO or you can’t connect to your Droplet with the Droplet Console.
TagsYour Droplet currently has no tags. Tags are a great way to group droplets. Learn how to get the most out of tags by reading our community tutorial ↗Edit
Projectfirst-projectEdit
RestartA power cycle will immediately hard reset the server. You should only choose this option when you are unable to reboot the Droplet from the command line.
Turn off DropletThis will turn off the Droplet, dropping any existing connections
Reset root passwordThis will shut down your Droplet and set a new root password.
RebuildThis will rebuild your Droplet using the image specified and its original configuration parameters. The rebuild process will destroy all data currently on this Droplet, so back up anything you want to keep.
DestroyThis is irreversible. We will destroy your Droplet and all Droplet data will be scrubbed and irretrievable.
Loading…
Add a public SSH key
Copy your public SSH key and paste it in the space below. For instructions on how, follow the steps on the right.
SSH Key content*Public Key is a required fieldGive your SSH Key a name*
Generating an SSH key pair
Follow these instructions to create or add SSH keys on Linux, MacOS & Windows. Windows users without OpenSSH can install and use PuTTY instead ↗
Step 1: Generate an SSH Key
Open your PowerShell(use regular mode, not administrator)
Run this commandssh-keygen
Follow the prompts
Enter file in which to save the key: Press Enter to use the default filename.
Step 1: Copy Your Public Key
Run this command to copy your public key to clipboard:pbcopy < ~/.ssh/id_ed25519.pubNote:If you used a custom filename or location in Step 1, replace id_ed25519.pub with your filename
Step 2: Use Your Public Key
Droplet을 둘 데이터센터를 고릅니다. 지역에 따라 고를 수 없는 요금제가 있습니다.Regular는 SSD, Premium AMD와 Premium Intel은 NVMe SSD 디스크를 사용합니다.Volume은 NVMe 네트워크 블록 저장소로, 떼어 내 다른 Droplet이나 GPU Droplet에 붙여 옮길 수 있습니다.주간 백업은 28일, 일간 백업은 7일 보관되며 금액은 Droplet 요금의 20%와 30%입니다.SSH 키가 비밀번호보다 안전한 접속 방법이며, Fedora처럼 SSH 키가 필요한 이미지는 Password 탭을 쓸 수 없습니다.IPv4를 끄면 같은 VPC 안에서만 닿고, IPv6는 따로 켭니다.DigitalOcean Metrics Agent를 설치해 더 자세한 지표, 그래프, 알림을 제어판에서 봅니다.Droplet이 처음 켜질 때 실행할 스크립트를 넣습니다.관리형 데이터베이스를 함께 만들며 월 $15.00가 더해지고, 켜 두면 Quantity를 바꿀 수 없습니다.같은 설정으로 Droplet 여러 대를 한 번에 만들며, 이름 칸이 대수만큼 늘어납니다.실제 계정에서는 결제 · 충전 창이 열립니다. 시뮬레이터에서는 결제하지 않습니다.실제 계정에서는 여기서 새 자원 만들기가 시작되고, 끝까지 진행하면 요금이 붙을 수 있습니다.실제 계정에서는 입력한 주소로 팀 초대 메일이 보내집니다.실제 계정에서는 이 자원이 지워지고 되돌릴 수 없습니다.실제 계정에서는 Droplet이 꺼지거나 다시 켜져 그동안 접속이 끊깁니다.실제 계정에서는 로그아웃되고 로그인 화면으로 돌아갑니다.실제 계정에서는 토큰 · 키가 만들어지고, 값은 만든 순간 한 번만 보입니다.실제 계정에서는 브라우저 안에 Droplet 콘솔 창이 열려 서버에 바로 들어갑니다.실제 계정에서는 이 기능이 켜지고 계정 설정이 바뀝니다.실제 계정에서는 약관 동의가 저장되고 모델을 부를 수 있게 됩니다.Marketplace 카탈로그는 제어판 밖 공개 사이트에서 열립니다.실제 계정에서는 값을 넣는 창이 열리고, 저장하면 계정에 더해집니다.실제 계정에서는 공개 SSH 키를 붙여 넣는 창이 열리고, 넣은 키가 이 목록에 더해집니다.화면을 불러오지 못했습니다. 페이지를 새로 고침해 주세요.
5️⃣ Droplet 콘솔 접속
📍 어디서: 디지털오션 제어판(브라우저) · 콘솔은 서버 안 · SSH 접속만 내 PC
[Create Droplet]을 누르면 방금 만든 Droplet의 상세 화면으로 바로 넘어갑니다. 이름 옆에 [Creating]과 진행 막대가 나오고, [Connection Details] 칸에는 만들기가 끝나야 접속할 수 있다는 안내가 있습니다.
잠시 뒤 상태가 [Active]로 바뀌면 [Connection Details]에 Public IPv4와, 같은 VPC 안에서만 사용하는 내부 주소인 Private IP가 나오고, 오른쪽 복사 버튼으로 주소를 그대로 가져갈 수 있습니다.
왼쪽 메뉴 [CORE CLOUD › Droplets]를 열면 만든 Droplet이 목록에 [Active] 상태로 나오고, [IP ADDRESS] 칸에서 같은 주소를 확인할 수 있습니다. 목록 위에는 자동 백업을 켜지 않은 Droplet이 있다는 [System Health Advisory] 안내가 뜹니다.
상세 화면 위 [Web Console] 버튼은 내 PC에 SSH 프로그램이 없어도 브라우저에서 서버에 접속하는 입구입니다. [Web Console]을 누르면 새 창이 열리고, [Registering SSH Key]가 잠시 나온 뒤 [root@Droplet 이름:~#] 프롬프트가 뜹니다.
🖥️ 터미널에서 하는 일
내 PC 터미널에서는 [ssh root@서버 IPv4 주소]로 접속합니다. Ubuntu로 만든 Droplet의 처음 사용자 이름은 서버 전체를 바꿀 수 있는 최고 관리자 계정인 root입니다.
6️⃣ Droplet 지우기
📍 어디서: 디지털오션 제어판(브라우저)
연습이 끝난 Droplet은 지워야 요금이 멈춥니다. 전원을 끈 Droplet도 서버 자원이 그대로 잡혀 있어 요금이 계속 쌓이기 때문입니다.
Droplet 요금은 만든 순간부터 쌓이고, 전원을 꺼도 멈추지 않으며, 지워야 멈춥니다.
💳 요금이 쌓이는 동안
요금 쌓임
요금 멈춤
🛠️ 만들기
Create Droplet
→
🟢 켜짐
Active
→
⏸️ 전원 끔
→
🗑️ 지우기
Destroy
아래 버튼을 누르면 그 단계의 요금이 어떻게 되는지 나옵니다.
요금은 [Create Droplet]을 누른 순간부터 쓴 시간만큼 쌓이며, $6.00/mo 요금제의 시간 요금은 $0.009/hour입니다.
전원을 끈 Droplet도 서버 자원이 그대로 잡혀 있어 요금이 계속 쌓입니다.
[Actions] 메뉴의 [Destroy]에서 확인 창에 Droplet 이름을 입력해야 지워지며, 그때 요금이 멈춥니다.
한 달에 672시간(28일)을 넘으면 요금이 더 늘지 않습니다.
달이 끝나면 그달 쓴 만큼 청구되며, 크레딧이나 선결제가 있으면 먼저 빠집니다. [Billing] 화면은 하루에 한 번 갱신됩니다.
지우기는 Droplet 상세 화면 오른쪽 위 [Actions] 메뉴의 [Destroy]에서 진행하며, 확인 창에 Droplet 이름을 입력해야 지워집니다.
[Destroy]를 누르면 [Droplet Danger Zone] 창의 [Destroy] 탭이 열리고, 지울 Droplet 이름이 위 칸에 나옵니다.
그 이름을 아래 [Enter the Droplet name] 칸에 똑같이 입력한 뒤 빨간 [Destroy] 버튼을 누릅니다.
지우기가 끝나면 [Droplet deleted successfully] 알림이 뜨고, Droplet이 하나도 없을 때의 [Droplets] 화면으로 돌아옵니다.
지운 뒤에는 [Billing] 화면에서 쓴 시간만큼 청구된 금액을 확인합니다.
🔢 FAQ & 추천 콘텐츠
[Add SSH Key]를 누른 뒤에도 인증 칸 목록이 그대로일 때가 있습니다. 2026년 11월 5일 확인에서는 Create Droplet 페이지를 새로 고치자 등록한 키가 목록에 나왔고, 앞에서 고른 지역과 요금제는 그대로 남아 있었습니다.
카드는 등록할 때 청구되지 않고(PayPal은 연결할 때 $5.00 선결제), 달이 끝나면 그달 쓴 만큼 청구서가 나옵니다. 크레딧이 있으면 그 청구에 먼저 쓰이며, 카드는 확인용 임시 승인이 최대 7일 동안 명세서에 보일 수 있다고 결제 수단 등록 창에 안내되어 있습니다.
[Authentication]에 [Password] 탭이 있어 root 비밀번호로도 만들 수 있습니다. 다만 디지털오션 화면은 SSH 키를 더 안전한 접속 방법으로 안내하고, Fedora 이미지에는 [Requires an SSH Key]가 붙어 있어, 이 이미지로는 SSH 키를 등록해야 Droplet을 만들 수 있습니다.
➡️ 다음 단계
Droplet에 접속한 뒤에는 root로 바로 작업하지 않고 서버 첫 설정부터 진행합니다.
ℹ️ 제휴 안내 본 사이트의 콘텐츠에는 제휴 링크가 포함되어 있습니다. 방문자가 이 링크를 통해 상품 또는 서비스를 구매하면 본 사이트는 판매처로부터 수수료를 지급받습니다. 이 과정에서 구매자가 지불하는 금액(이벤트 할인 시 금액이 내려갑니다↓)은 오르지 않습니다. 게시된 가격·할인·재고 정보는 작성 시점 기준이며 실제와 다를 수 있으므로, 구매 전 판매처에서 최종 확인하시기 바랍니다. 상품 선정과 평가는 자체 기준에 따라 작성되며, 수수료 지급 여부가 소개 순서나 평가 내용에 영향을 주지 않습니다.