
findmnt Command: Checking the Mount Tree and Verifying fstab with the verify Option
The findmnt command is a Linux command that prints the currently mounted file systems as a tree, finds mounts by device, path or type, and checks the fstab file. On a Debian 12 server, after checking the mount tree and disk capacity, a test fstab file with deliberately wrong lines was checked with --verify, which found the missing mount points and device as 3 errors before a reboot.
The output below was taken under a regular user account on a Debian 12 server with findmnt from util-linux 2.38 and is shown as is; only the account and host name in the simulator (user@server) are example values. findmnt from util-linux 2.37 on an AlmaLinux 9 server also had every option used in this article, and the single line of the fstab check result under the root account was confirmed on that server. The test fstab files were created in a temporary folder and deleted after the check, and the real /etc/fstab was only read.
1️⃣ Basic Usage of the findmnt Command and Tree Output
Running findmnt without options prints every currently mounted file system as a tree.
findmntTARGET SOURCE FSTYPE OPTIONS
/ /dev/vda2 ext4 rw,relatime,errors=remount-ro
|-/sys sysfs sysfs rw,nosuid,nodev,noexec,relatime
| |-/sys/kernel/security securityfs securityfs rw,nosuid,nodev,noexec,relatime
| |-/sys/fs/cgroup cgroup2 cgroup2 rw,nosuid,nodev,noexec,relatime,nsdelegate,memory_recursiveprot
| |-/sys/fs/pstore pstore pstore rw,nosuid,nodev,noexec,relatime
| |-/sys/firmware/efi/efivars efivarfs efivarfs rw,nosuid,nodev,noexec,relatime
| |-/sys/fs/bpf bpf bpf rw,nosuid,nodev,noexec,relatime,mode=700
| |-/sys/kernel/debug debugfs debugfs rw,nosuid,nodev,noexec,relatime
| |-/sys/kernel/tracing tracefs tracefs rw,nosuid,nodev,noexec,relatime
| |-/sys/kernel/config configfs configfs rw,nosuid,nodev,noexec,relatime
| `-/sys/fs/fuse/connections fusectl fusectl rw,nosuid,nodev,noexec,relatime
|-/proc proc proc rw,nosuid,nodev,noexec,relatime
| `-/proc/sys/fs/binfmt_misc systemd-1 autofs rw,relatime,fd=31,pgrp=1,timeout=0,minproto=5,maxproto=5,direct,pipe_ino=13385
| `-/proc/sys/fs/binfmt_misc binfmt_misc binfmt_misc rw,nosuid,nodev,noexec,relatime
|-/dev udev devtmpfs rw,nosuid,relatime,size=453484k,nr_inodes=113371,mode=755,inode64
| |-/dev/pts devpts devpts rw,nosuid,noexec,relatime,gid=5,mode=620,ptmxmode=000
| |-/dev/shm tmpfs tmpfs rw,nosuid,nodev,inode64
| |-/dev/hugepages hugetlbfs hugetlbfs rw,relatime,pagesize=2M
| `-/dev/mqueue mqueue mqueue rw,nosuid,nodev,noexec,relatime
|-/run tmpfs tmpfs rw,nosuid,nodev,noexec,relatime,size=97784k,mode=755,inode64
| |-/run/lock tmpfs tmpfs rw,nosuid,nodev,noexec,relatime,size=5120k,inode64
| |-/run/credentials/systemd-sysusers.service ramfs ramfs ro,nosuid,nodev,noexec,relatime,mode=700
| |-/run/credentials/systemd-tmpfiles-setup-dev.service ramfs ramfs ro,nosuid,nodev,noexec,relatime,mode=700
| |-/run/credentials/systemd-sysctl.service ramfs ramfs ro,nosuid,nodev,noexec,relatime,mode=700
| |-/run/credentials/systemd-tmpfiles-setup.service ramfs ramfs ro,nosuid,nodev,noexec,relatime,mode=700
| |-/run/user/1001 tmpfs tmpfs rw,nosuid,nodev,relatime,size=97780k,nr_inodes=24445,mode=700,uid=1001,gid=1001,inode64
| `-/run/user/1004 tmpfs tmpfs rw,nosuid,nodev,relatime,size=97780k,nr_inodes=24445,mode=700,uid=1004,gid=33,inode64
`-/boot/efi /dev/vda1 vfat rw,relatime,fmask=0077,dmask=0077,codepage=437,iocharset=ascii,shortname=mixed,utf8,errors=remount-roThe top line is the root (/), and the lines connected below it by [|-] and [`-] are the file systems mounted inside it. Of the 28 mounts, only two lines were real disk partitions, /dev/vda2 (/) and /dev/vda1 (/boot/efi), and the remaining lines under /sys, /proc, /dev and /run were virtual file systems that the kernel creates in memory.
The meaning of each column is shown in the table below.
| Field | Meaning |
|---|---|
| TARGET | Mount point. The directory where the file system is attached |
| SOURCE | Mounted device. For virtual file systems, a type name such as sysfs or tmpfs appears |
| FSTYPE | File system type (ext4, vfat, tmpfs, etc.) |
| OPTIONS | Mount options. rw means read-write, ro means read-only |
Giving a device or a mount point as an argument prints only that line.
findmnt /TARGET SOURCE FSTYPE OPTIONS
/ /dev/vda2 ext4 rw,relatime,errors=remount-roGiving a directory that is not a mount point prints nothing. With /var/log, it finished with no output.
findmnt /var/logWhen there is no output, the exit code can be checked with echo $?.
echo $?12️⃣ findmnt Options for Checking Mounts: -T, -t, -S
A path that is not a mount point, such as /var/log, can be passed to -T to find the file system that contains it.
findmnt -T /var/logTARGET SOURCE FSTYPE OPTIONS
/ /dev/vda2 ext4 rw,relatime,errors=remount-ro/var/log was inside the root (/) file system. The manual explains that if the path given to -T is not a mount point, the path is walked up one level at a time to find the mount point. With /run/lock, which is itself a mount point, the tmpfs line appeared.
findmnt -T /run/lockTARGET SOURCE FSTYPE OPTIONS
/run/lock tmpfs tmpfs rw,nosuid,nodev,noexec,relatime,size=5120k,inode64-T also shows right away whether a log or backup folder is on a separate disk, and which device holds a path that has filled up.
-t filters by file system type. Several types can be joined with commas, and with ext4 and vfat only the two disk partition lines remained.
findmnt -t ext4,vfatTARGET SOURCE FSTYPE OPTIONS
/ /dev/vda2 ext4 rw,relatime,errors=remount-ro
`-/boot/efi /dev/vda1 vfat rw,relatime,fmask=0077,dmask=0077,codepage=437,iocharset=ascii,shortname=mixed,utf8,errors=remount-roWhen the type is not known, use --real. It keeps only the file systems of real devices, so on this server it printed the same two lines as -t ext4,vfat, while --pseudo, the opposite, printed the remaining 26 virtual file system lines.
findmnt --realTARGET SOURCE FSTYPE OPTIONS
/ /dev/vda2 ext4 rw,relatime,errors=remount-ro
`-/boot/efi /dev/vda1 vfat rw,relatime,fmask=0077,dmask=0077,codepage=437,iocharset=ascii,shortname=mixed,utf8,errors=remount-roA type that is mounted in several places, such as tmpfs, is printed as a tree. Adding -l to the same condition prints one entry per line without the tree lines, which is handy for passing to grep or other commands.
findmnt -t tmpfsTARGET SOURCE FSTYPE OPTIONS
/dev/shm tmpfs tmpfs rw,nosuid,nodev,inode64
/run tmpfs tmpfs rw,nosuid,nodev,noexec,relatime,size=97784k,mode=755,inode64
|-/run/lock tmpfs tmpfs rw,nosuid,nodev,noexec,relatime,size=5120k,inode64
|-/run/user/1001 tmpfs tmpfs rw,nosuid,nodev,relatime,size=97780k,nr_inodes=24445,mode=700,uid=1001,gid=1001,inode64
`-/run/user/1004 tmpfs tmpfs rw,nosuid,nodev,relatime,size=97780k,nr_inodes=24445,mode=700,uid=1004,gid=33,inode64findmnt -l -t tmpfsTARGET SOURCE FSTYPE OPTIONS
/run tmpfs tmpfs rw,nosuid,nodev,noexec,relatime,size=97784k,mode=755,inode64
/dev/shm tmpfs tmpfs rw,nosuid,nodev,inode64
/run/lock tmpfs tmpfs rw,nosuid,nodev,noexec,relatime,size=5120k,inode64
/run/user/1001 tmpfs tmpfs rw,nosuid,nodev,relatime,size=97780k,nr_inodes=24445,mode=700,uid=1001,gid=1001,inode64
/run/user/1004 tmpfs tmpfs rw,nosuid,nodev,relatime,size=97780k,nr_inodes=24445,mode=700,uid=1004,gid=33,inode64-S finds by device. Besides a device name, the UUID= and LABEL= forms can also be used.
findmnt -S /dev/vda1TARGET SOURCE FSTYPE OPTIONS
/boot/efi /dev/vda1 vfat rw,relatime,fmask=0077,dmask=0077,codepage=437,iocharset=ascii,shortname=mixed,utf8,errors=remount-roWith /dev/vda9, a device that does not exist, it finished with no output and the exit code was 1.
3️⃣ findmnt -o Output Columns and Checking Capacity with -D
-o chooses the columns to print. Adding the size and usage columns showed the mount list and the capacity at once.
findmnt -o TARGET,SOURCE,FSTYPE,SIZE,USED,AVAIL,USE% -t ext4,vfatTARGET SOURCE FSTYPE SIZE USED AVAIL USE%
/ /dev/vda2 ext4 22.9G 11.2G 10.7G 49%
`-/boot/efi /dev/vda1 vfat 511M 11.8M 499.2M 2%Putting + in front of a column name keeps the four default columns and appends it after them.
findmnt -o +SIZE,USED -t ext4TARGET SOURCE FSTYPE OPTIONS SIZE USED
/ /dev/vda2 ext4 rw,relatime,errors=remount-ro 22.9G 11.2GThe available columns are in the [Available output columns] list at the end of findmnt -h. The commonly used ones are below.
| Field | Meaning |
|---|---|
| SIZE | Total size of the file system |
| USED | Used size |
| AVAIL | Available size |
| USE% | Usage rate |
| UUID | File system UUID |
| LABEL | File system label |
| MAJ:MIN | Major and minor numbers of the device |
| PASSNO | fsck check order at boot. A column that appears only when viewing fstab |
-D works like the df command, printing the size and usage of each device. Lines such as /sys and /proc were left out, and the tmpfs lines, which are held in memory, remained.
findmnt -DSOURCE FSTYPE SIZE USED AVAIL USE% TARGET
udev devtmpfs 442.9M 0 442.9M 0% /dev
tmpfs tmpfs 95.5M 1.5M 94M 2% /run
/dev/vda2 ext4 22.9G 11.2G 10.7G 49% /
tmpfs tmpfs 477.5M 1.1M 476.3M 0% /dev/shm
tmpfs tmpfs 5M 0 5M 0% /run/lock
/dev/vda1 vfat 511M 11.8M 499.2M 2% /boot/efi
tmpfs tmpfs 95.5M 0 95.5M 0% /run/user/1001
tmpfs tmpfs 95.5M 0 95.5M 0% /run/user/1004Adding -t ext4,vfat to this left only the two disk lines.
findmnt -D -t ext4,vfatSOURCE FSTYPE SIZE USED AVAIL USE% TARGET
/dev/vda2 ext4 22.9G 11.2G 10.7G 49% /
/dev/vda1 vfat 511M 11.8M 499.2M 2% /boot/efiTo pull out a single value in a script, -n removes the header line and -o keeps a single column. The device name of the root (/) and the type of the file system that holds /var/log were each printed on one line.
findmnt -n -o SOURCE //dev/vda2findmnt -n -o FSTYPE -T /var/logext4Both commands printed just one line with the value and no header line, so the result can be stored in a shell variable or compared in a conditional as is.
4️⃣ The findmnt verify Option and Checking fstab
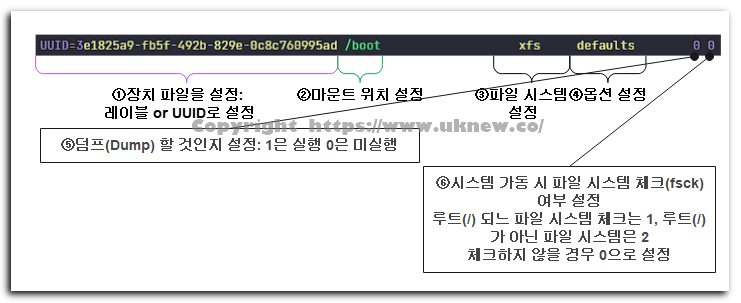
File systems to be mounted automatically at reboot are written in /etc/fstab. -s prints the contents of fstab as a list instead of the current mount state.
findmnt -sTARGET SOURCE FSTYPE OPTIONS
/ UUID=3edd5f66-5479-489a-866b-93bc758c1caa ext4 errors=remount-ro
/boot/efi UUID=80EC-0CF3 vfat umask=0077
/media/cdrom0 /dev/sr0 udf,iso9660 user,noauto
/media/cdrom1 /dev/sr1 udf,iso9660 user,noauto
swap /swapfile swap defaultsThe UUID= value in the SOURCE column is a unique number attached to each file system, and the UUID of each device can be checked with the blkid command. This fstab also contained two CD device lines (/dev/sr0, /dev/sr1) and one swap file line.
If an fstab line is wrong, that file system is not mounted at reboot. --verify does not actually mount anything and checks the mount point, device and type on each line of fstab.
findmnt --verify
0 parse errors, 0 errors, 7 warnings
/
   [W] cannot detect on-disk filesystem type (Permission denied)
/boot/efi
   [W] cannot detect on-disk filesystem type (Permission denied)
/media/cdrom0
   [W] cannot detect on-disk filesystem type (Permission denied)
/media/cdrom1
   [W] unreachable source: /dev/sr1: No such file or directory
   [W] cannot detect on-disk filesystem type (No such file or directory)
swap
   [W] non-bind mount source /swapfile is a directory or regular file
   [W] cannot detect on-disk filesystem type (Permission denied)
echo $?0The first line is the summary, followed by what to check for each mount point. There were 0 errors and 7 warnings, and the exit code was 0. /dev/sr1 is a device that does not exist on this server, so an [unreachable source] warning appeared, and the swap line got a warning that it is a regular file rather than a device.
The remaining [cannot detect on-disk filesystem type (Permission denied)] warnings appeared because a regular account cannot read the disk devices directly. On the AlmaLinux 9 server, where it was run under the root account with --verbose, a [FS type is xfs] line appeared instead of this warning.
Adding --verbose also prints the items that passed without problems as [ ] lines. Giving one mount point checks only that line.
findmnt --verify --verbose /boot/efi
0 parse errors, 0 errors, 1 warning
/boot/efi
   [ ] target exists
   [ ] FS options: umask=0077
   [ ] UUID=80EC-0CF3 translated to /dev/vda1
   [ ] source /dev/vda1 exists
   [W] cannot detect on-disk filesystem type (Permission denied)
UUID=80EC-0CF3 was converted to /dev/vda1, followed by the results of checking in turn whether the mount point and the device exist.
A test fstab file was created to see how errors appear. The / and /boot/efi lines are the same as in the real fstab, while the /mnt/data line was given a UUID and a directory that do not exist, and the /backup line a device that does not exist and a misspelled type (ext44).
cat fstab.test# test fstab for findmnt --verify
UUID=3edd5f66-5479-489a-866b-93bc758c1caa / ext4 errors=remount-ro 0 1
UUID=80EC-0CF3 /boot/efi vfat umask=0077 0 1
UUID=1b4e28ba-2fa1-11d2-883f-0016d3cca427 /mnt/data ext4 defaults,nofail 0 2
/dev/vdb1 /backup ext44 defaults 0 2
tmpfs /run/lock tmpfs size=5m 0 0Passing this file with --tab-file checks it instead of /etc/fstab.
findmnt --verify --tab-file fstab.test
0 parse errors, 3 errors, 5 warnings
/
   [W] cannot detect on-disk filesystem type (Permission denied)
/boot/efi
   [W] cannot detect on-disk filesystem type (Permission denied)
/mnt/data
   [E] unreachable on boot required target: No such file or directory
   [E] unreachable on boot required source: UUID=1b4e28ba-2fa1-11d2-883f-0016d3cca427
/backup
   [E] unreachable on boot required target: No such file or directory
   [W] unreachable source: /dev/vdb1: No such file or directory
   [W] ext44 seems unsupported by the current kernel
   [W] cannot detect on-disk filesystem type (No such file or directory)
echo $?1There were 3 errors and 5 warnings, and the exit code was 1. For /mnt/data neither the mount point nor the UUID could be found, giving two [E] lines, and it was reported as an error even though the line had the nofail option. /backup got an [E] because the mount point does not exist, while the missing device and the fact that the current kernel does not support ext44 were reported as [W]. The tmpfs line, which had no problems, did not appear in the output.
If an fstab line does not have enough fields, that line cannot be read. Checking fstab.bad, whose line 2 stops at the mount point, produced a [parse error], and findmnt skipped that line and checked the rest.
cat fstab.badUUID=3edd5f66-5479-489a-866b-93bc758c1caa / ext4 errors=remount-ro 0 1
/dev/vdb2 /backup2
UUID=80EC-0CF3 /boot/efi vfat umask=0077 0 1findmnt --verify --tab-file fstab.badfindmnt: fstab.bad: parse error at line 2 -- ignored
1 parse error, 0 errors, 2 warnings
/
[W] cannot detect on-disk filesystem type (Permission denied)
/boot/efi
[W] cannot detect on-disk filesystem type (Permission denied)echo $?1The exit code of this check was also 1. The symbols in front of the result lines are as follows.
| Symbols | Meaning |
|---|---|
| [ ] | An item that passed the check. Printed only with --verbose |
| [W] | Warning. An item whose device or type could not be checked; with warnings only, the exit code is 0 |
| [E] | Error. An item whose mount point or device needed at boot could not be found. Exit code 1 |
| parse error | A line that could not be read because fields are missing. That line is skipped and the rest is checked. Exit code 1 |
The check of the real /etc/fstab, which had only warnings, had exit code 0. So after editing fstab, run --verify before rebooting and check the [E] lines and the exit code first.
🔲 findmnt Command Options
| Option | Copy | Description |
|---|---|---|
| -T--target | The file system that contains the path | |
| -t--types | File system type. Several can be listed with commas, and putting no in front excludes that type | |
| -S--source | A device name, or a device in UUID= or LABEL= form | |
| -O--options | Mount options (ro, etc.) | |
| --real | Only file systems of real devices | |
| --pseudo | Only virtual file systems | |
| -l--list | Print as a list, one per line, instead of a tree | |
| -o--output | Choose the columns to print. Putting + in front of a column name appends it after the four default columns | |
| -D--df | Print the size and usage of each device, like the df command | |
| -n--noheadings | Print without the header line | |
| -s--fstab | Print the contents of fstab as a list instead of the current mount state | |
| --verify-x | Check the mount point, device and type on each line of fstab without actually mounting | |
| --verbose | Also print the items that passed --verify without problems as [ ] lines | |
| --tab-file-F | Check the specified file instead of /etc/fstab | |
| -J--json | Print as JSON |
| Option | Copy | Description |
|---|---|---|
| -k--kernel | Search in the kernel mount table (default) | |
| -m--mtab | Search in the mount table (including userspace mount options) | |
| -M--mountpoint | Search by mount point directory | |
| -f--first-only | Print only the first file system found | |
| -i--invert | Invert the search conditions | |
| -R--submounts | Also print the submounts of the file systems found | |
| -e--evaluate | Print tags such as LABEL and UUID converted to device names | |
| -p--poll | Keep watching for changes in the mount table | |
| -b--bytes | Print sizes in bytes | |
| -r--raw | Print in raw format without aligned columns | |
| -P--pairs | Print column names and values as pairs | |
| -u--notruncate | Print without truncating the text in columns |
🔲 findmnt Command Simulator
In the simulator below, the findmnt commands run in this article can be entered as they are. The home folder has the test files fstab.test and fstab.bad, so even the --verify --tab-file check can be tried.
5️⃣ Practical Examples of the findmnt Command
This section shows results checked with findmnt from util-linux 2.37 under the root account of an AlmaLinux 9 test server, with the ext4 partition of a practice disk image mounted on /mnt/data. Newly created test fstab files were checked instead of /etc/fstab, and the fstab.test check used in 4️⃣ can be entered directly in the findmnt command simulator.
🔲 findmnt fstab File Check Example
First, -T was used to check which file system /mnt/data is on. -o printed only the TARGET, SOURCE and FSTYPE columns.
findmnt -o TARGET,SOURCE,FSTYPE -T /mnt/dataTARGET SOURCE FSTYPE
/mnt/data /dev/loop0p1 ext4/mnt/data was an ext4 file system on the /dev/loop0p1 device.
When adding a new line to fstab, /etc/fstab was not edited directly; the line was checked first in a test file. A single line that mounts this partition on /mnt/data was put in the fstab.new file.
cat fstab.newUUID=a6cc048b-801c-4569-8a50-1b00976b2ed4 /mnt/data ext4 defaults,nofail 0 2This file was specified with --tab-file and checked.
findmnt --verify --tab-file fstab.newSuccess, no errors or warnings detectedThere were no errors or warnings, so the single line [Success, no errors or warnings detected] appeared and the exit code was 0.
Whether each field of the line held the intended value was checked with -s.
findmnt -s --tab-file fstab.newTARGET SOURCE FSTYPE OPTIONS
/mnt/data UUID=a6cc048b-801c-4569-8a50-1b00976b2ed4 ext4 defaults,nofailThe values entered appeared as they were in the TARGET, SOURCE, FSTYPE and OPTIONS columns.
🔲 Common Mistakes When Using findmnt
A mistake that is easy to make at first is a typo in the mount point path. A line with /mnt/data mistyped as /mnt/dta was put in the fstab.typo file and checked.
findmnt --verify --tab-file fstab.typo/mnt/dta
[E] unreachable on boot required target: No such file or directory
0 parse errors, 1 error, 0 warningsOne [E] line appeared under /mnt/dta and the exit code was 1. The same [unreachable on boot required target] error also appears when a line is added before the mount point directory has been created.
The mistake of adding the same line twice was also checked. fstab.new was copied to fstab.dup, the same line was added once more, and the file was checked.
findmnt --verify --tab-file fstab.dup/mnt/data
[W] target specified more than once
0 parse errors, 0 errors, 1 warningA [target specified more than once] warning appeared, but since it is a warning and not an error, the exit code was 0. A script that checks only the exit code will miss this case.
Option spelling was also checked. A line with defaults mistyped as defualts was put in the fstab.opt file and checked.
findmnt --verify --tab-file fstab.optSuccess, no errors or warnings detectedThe check result was [Success, no errors or warnings detected] and the exit code was also 0. A misspelled option does not show up in the --verify result, so it was checked directly by adding -o TARGET,OPTIONS to -s.
findmnt -s --tab-file fstab.opt -o TARGET,OPTIONSTARGET OPTIONS
/mnt/data defualts,nofaildefualts,nofail appeared as is in the OPTIONS column, so the typo could be found.
🔲 Checking the Change in findmnt verify Results
For the check results, the summary line and the exit code were checked first. fstab.new, which had no problems, gave [Success, no errors or warnings detected] with exit code 0, and fstab.typo, with the path typo, changed to [0 parse errors, 1 error, 0 warnings] with exit code 1. fstab.dup, which has the same line twice, gave [0 parse errors, 0 errors, 1 warning] with exit code 0.
The items checked on a line that passed were printed with --verbose. The mount point was given as an argument so that only that line was checked.
findmnt --verify --verbose --tab-file fstab.new /mnt/data/mnt/data
[ ] target exists
[ ] userspace options: nofail
[ ] UUID=a6cc048b-801c-4569-8a50-1b00976b2ed4 translated to /dev/loop0p1
[ ] source /dev/loop0p1 exists
[ ] FS type is ext4
Success, no errors or warnings detectedThe output showed the order: the mount point was checked, then the UUID was converted to /dev/loop0p1 and the device was checked for existence. nofail appeared separately as the [userspace options: nofail] line, and because it was the root account, the type on the disk was read as well and the [FS type is ext4] line appeared.
🔢 FAQ & Recommended Content
 Linux · Disk
Swap Memory setup: swapon, mkswap commands
How to create swap, which uses disk space like memory, in two ways, as a partition and as a file, and enable it with mkswap and swapon.
 Linux · Disk
gdisk Command: Linux Partition Setup and Creating and Deleting GPT Partitions
How to set up Linux partitions by creating, modifying and deleting partitions on a GPT disk with gdisk.
 Linux · Disk
du command: checking file disk usage
How to use the du command to check how much disk space files and directories use.
ℹ️ Affiliate Disclosure
This site's content contains affiliate links. When a visitor buys a product or service through one of them, the site receives a commission from the seller. The amount the buyer pays(it goes down during event discounts ↓)does not go up. Posted prices, discounts, and stock reflect the time of writing and may differ, so confirm with the seller before buying. Products are chosen and reviewed by our own standards, and commissions do not affect the order or content of reviews.