Test environmentCloudways|Debian 12|PHP 8.2.33|WordPress 7.1.3|Checked 2026-10-11
Cloudways SFTP·SSH connections use the Public IP, Username and Password from Master Credentials on the server management screen, on port 22. If you leave the port empty in FileZilla, it tries FTP on port 21 and gets nowhere, and you cannot paste the password into the web SSH terminal that opens in the browser.
TOC
7mn read
TOC
7mn read
View more
1️⃣ Cloudways SFTP and SSH Account Types
Cloudways has two kinds of SFTP and SSH accounts: master credentials, which access the whole server, and application credentials, which access a single application only. You find the master credentials—Public IP, Username and Password—under [Master Credentials] in the server menu, and a session starts in [/home/master]. Because the [applications] folder holds every application folder on the server, these credentials are not suitable for handing to a freelancer who should only work on one site's files.
Application credentials are created by clicking [Add SFTP User] under [Application Credentials] at the bottom of the application's [Access Details], and you can add several accounts. When you connect over SFTP with such an account, that application's folder is shown as the top-level folder (/). For SSH, the application setting [SSH Shell Access] is off by default, so right after login [Shell access is disabled !] appears and the connection closes.
The new account appears in the [SSH/SFTP Details] list, and you can add more accounts the same way.
unified.cloudways.com/server/…/access_detail
CLOUDWAYSmy-server › Master Credentials
Master Credentials
Need Help ⓘ
SFTP and SSH access details for all applications
Public IP
203.0.113.24
Username
master_user_a
Password
••••••••••
You have the Master credentials above to gain the access for SFTP or SSH (e.g using Putty) Alternatively, you can upload multiple SSH Public Keys to your Cloudways server to access it without password prompts.
SSH Public Keys
Or, launch SSH terminal in your browser by clicking the button below.
Launch SSH Terminal
unified.cloudways.com/apps/…/access_detail
CLOUDWAYSmy-server › my-app › Access Details
Application Credentials
You can create and use multiple Application credentials for SFTP or SSH access to this Application. More details
Public IP
203.0.113.24
SSH/SFTP Details
UsernamePasswordSSH
No data Available
app_user_a***********View SSH Keys⋮
App Credentials
Username
Enter Usernameapp_user_a
Password
Enter Password••••••••••
✓ You are all set!
Click an enabled item in the left menu or a button on the screen.
2️⃣ FileZilla SFTP Connection Settings
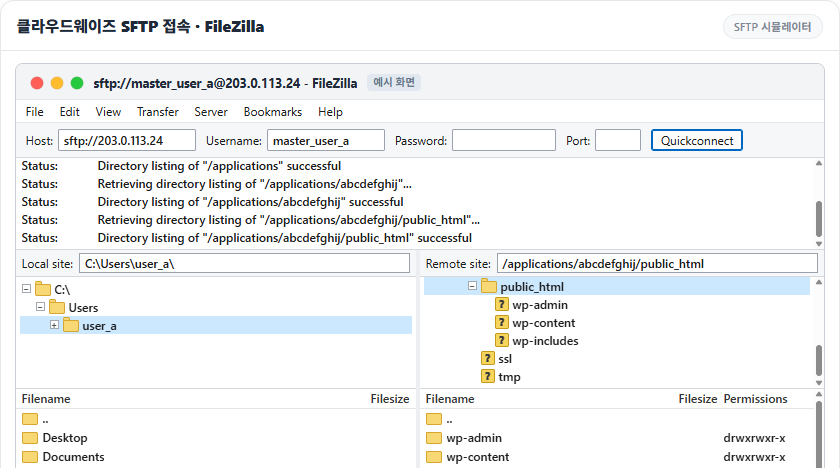
In FileZilla's Quickconnect, if you leave the Port field empty and enter only the IP in Host, FileZilla tries FTP instead of SFTP. When the log shows only [Connecting to server IP:21…] and goes no further, it is because the Cloudways server does not respond on port 21.
Either prefix the Public IP with [sftp://] in Host or enter 22 in Port, then paste the Username and Password from the master or application credentials. On the first connection an [Unknown host key] window opens. Check [Always trust this host, add this key to the cache] and click [OK], and the window will not appear on later connections.
If you connected with the master credentials, the WordPress files are in [applications] › application folder › [public_html].
The server’s host key is unknown. You have no guarantee that the server is the computer you think it is.
Details
Host:203.0.113.24:22
Hostkey algorithm:ssh-ed25519
Fingerprint:
Trust this host and carry on connecting?
A simplified example of the FileZilla screen. Press the chips in order or type into the fields yourself.
It runs only in your browser and does not connect to any server. It is a scaled-down drawing of the English FileZilla interface, and the IP, account and application folder names are example values. The log messages and folder list were checked by actually connecting to a Cloudways test server.
3️⃣ Connecting via the Web SSH Terminal and PowerShell
FileZilla lets you move files, but commands such as WP-CLI run in a terminal connected over SSH. Click [Launch SSH Terminal] in [Master Credentials] and a web SSH terminal opens in a new browser tab. Enter the Username at [login:] and the password at [Password:] to connect.
You cannot paste a copied password into the web SSH terminal, so you have to type it, and what you type is not shown on screen. To connect by pasting the password, enter [ssh account@server IP] in Windows PowerShell.
Cloudways web SSH terminal · Browser
SSH Simulator
Shell In A Box×
!주의 요함https://203.0.113.24:4200
1234567.cloudwaysapps.com login:
Click Launch SSH Terminal in Master Credentials and this screen opens in a new browser tab. Enter the Username at login:.
It runs only in your browser and does not connect to any server. The screens and output were actually received from the web SSH terminal of a Cloudways test server (Debian 12), and the IP, account, server number and application folder names are example values. File contents are not included, and commands that change files are blocked.
Copyright (C) Microsoft Corporation. All rights reserved.
PS C:\Users\user_a>
Press the chips in order, or click the terminal and type the commands yourself.
It runs only in your browser and does not connect to any server. The output was actually received from Windows PowerShell and a Cloudways test server (Debian 12), and the IP, account, server number, application folder names and fingerprint are example values. File contents are not included, and commands that change files are blocked.
The Cloudways master account has no [ll] alias, so typing [ll] shows [bash: ll: command not found] and you list files with the ls command instead. The simulator includes the [ll] command too: enter [alias ll=’ls -l’] first and [ll] shows the same list.
[.bashrc] has an immutable attribute and cannot be edited with the master account, so to use [ll] on every login, save the alias in the [.bash_aliases] file in your home folder. How to save it is explained in the Linux ls command article.
4️⃣ Adding an SSH Key
When you set up SSH key login, what you register with Cloudways is the public key, not the private key. Keep the private key only on the computer you connect from, and copy and register the contents of the public key file ending in [.pub].
ssh-keygen-ted25519-C'my-key'
Generating public/private ed25519 key pair.Enter file in which to save the key (/root/.ssh/id_ed25519): /root/.ssh/cloudways_ed25519Enter passphrase for '/root/.ssh/cloudways_ed25519' (empty for no passphrase): Enter same passphrase again: Your identification has been saved in /root/.ssh/cloudways_ed25519Your public key has been saved in /root/.ssh/cloudways_ed25519.pubThe key fingerprint is:SHA256:xxxxxxxxxxxxxxxxxxxxxxxxxxxxxxxxxxxxxxxxxxx my-keyThe key's randomart image is:+--[ED25519 256]--+| o. o*|| . .. .o.|| .. .o || .. o. . .+ o|| .o=S.o +o.E || ==*=o. o. || oo=oBo. || .+O+o || oB* |+----[SHA256]-----+
Create the key with [ssh-keygen -t ed25519]; it produces two files, the private key and the [.pub] public key. Click [SSH Public Keys] in [Master Credentials], enter a name to tell it apart in [Label] and the public key contents in [SSH Key], then click [Submit].
If you have already added an SSH key, clicking [SSH Public Keys] first shows the key list and an [Add] button instead of the [Label] and [SSH Key] fields.
Click [SSH Public Keys] below [Master Credentials] to open the [Add/Update SSH Keys] window.
📍Master Credentials›SSH Public Keys›Add/Update SSH Keys
Add public key
Enter a name to tell it apart in [Label], paste the contents of the [.pub] public key file into [SSH Key], and click [Submit].
📍Master Credentials›SSH Public Keys›Add/Update SSH Keys
Key list
Added keys appear in the same window under their [Label] name; use the pencil and trash icons to edit or delete them.
unified.cloudways.com/server/…/access_detail
CLOUDWAYSmy-server › Master Credentials
Master Credentials
Need Help ⓘ
SFTP and SSH access details for all applications
Public IP
203.0.113.24
Username
master_user_a
Password
••••••••••
You have the Master credentials above to gain the access for SFTP or SSH (e.g using Putty) Alternatively, you can upload multiple SSH Public Keys to your Cloudways server to access it without password prompts.
Or, launch SSH terminal in your browser by clicking the button below.
Launch SSH Terminal
Add/Update SSH Keys
Label
my-key
SSH Key
ssh-ed25519 AAAAC3NzaC1lZDI1NTE5AAAA… my-key
my-key
Add
Click an enabled item in the left menu or a button on the screen.
The authenticity of host '203.0.113.24 (203.0.113.24)' can't be established.ED25519 key fingerprint is SHA256:xxxxxxxxxxxxxxxxxxxxxxxxxxxxxxxxxxxxxxxxxxx.This key is not known by any other names.Are you sure you want to continue connecting (yes/no/[fingerprint])? yesWarning: Permanently added '203.0.113.24' (ED25519) to the list of known hosts.Linux 1234567.cloudwaysapps.com 6.1.0-53-amd64 #1 SMP PREEMPT_DYNAMIC Debian 6.1.187-1 (2026-09-07) x86_64******************************PLEASE NOTE********************************* If this a new instance, cloud-init may still be running and normal ** operations may not work as expected. ** ** Please use `cloud-init status' to check on the status of the instance ** provisioning ** ** Remove this message by editing /etc/motd **************************************************************************Last login: Sun Oct 11 02:13:08 2026 from 198.51.100.7master_user_a@1234567:~$
Registered keys appear in the same window under their [Label] name, and you edit or delete them with the pencil and trash icons next to them. Once a key is registered, connecting with [ssh -i private key file account@server IP] logs you straight in without any prompt if the key has an empty passphrase.
5️⃣ Setting Up the Shell Access IP Whitelist
Which IPs can connect to a Cloudways server over SSH and SFTP is set in the server's [Security] › [Shell Access]. The default is [Allow all IP addresses, except those blocked by the Cloudways security system.] It allows connections from all IPs, and the Cloudways security system blocks IPs that get the credentials wrong several times.
Select [Block all IP addresses, except those on the Whitelist.] and, in [Add IP to Whitelist], enter the public IP of the PC you will connect from, then click [Add]. Check that the IP in the list is correct, then click [Save Changes].
When you open [Shell Access], the [SSH/SFTP] tab has the default selected, which allows connections from any IP.
📍Servers›my-server›Security›Shell Access
Add to whitelist
Select [Block all IP addresses, except those on the Whitelist.]. Enter the public IP of the PC that will connect in [Add IP to Whitelist] and click [Add].
📍Servers›my-server›Security›Shell Access
Save
Check the IP that went into the list, then click [Save Changes] to apply the setting.
Manage Shell Access and whitelist your IP and/or IP subnets for SSH/SFTP and MySQL connections.
SSH/SFTPMySQL
Allow all IP addresses, except those blocked by the Cloudways security system.By default, allow all IP addresses and let the Cloudways security system blocks those that try to exploit SSH/SFTP on your server. In other instances, you can lock yourself out if you input the incorrect credentials several times. To avoid lockouts, you can whitelist your IPs.
Block all IP addresses, except those on the Whitelist.By default, block all IP addresses except those on the whitelist. To allow an IP to SSH/SFTP to your server, you will need to whitelist the IP first.
Whitelist IPAdd IP to Whitelist198.51.100.7
198.51.100.7
*To apply your changes, please click on the SAVE CHANGES button.
Click an enabled item in the left menu or a button on the screen.
On the test server, I saved the list with only one PC's IP: the listed PC still connected as before, while another server not on the list got [ssh: connect to host server IP port 22: Connection timed out].
If you save the whitelist with an empty list, every IP is blocked, including your own PC. Even then the Cloudways management console still opens, so switch the same menu back to the default and save to connect again.
🛡️ Shell AccessBlock all IP addresses, except those on the Whitelist.Whitelist IP198.51.100.7Empty
Passes→
☁️ Cloudways server203.0.113.24 · SSH·SFTP
The PC added to the list connected on port 22 just as it did before the whitelist was turned on.
A server not on the list got no refusal message and simply ended with [ssh: connect to host server IP port 22: Connection timed out].
Saving with an empty list blocks your own PC too; switch back to the default in the same menu and save to connect again.
🔢 FAQ & Recommended Content
Connect over SSH, move to the application's [public_html] folder and run it there. If you enter [wp core version] in another folder, you get [Error: This does not seem to be a WordPress installation.]
Yes. The [Master Credentials] notice also says you can upload several SSH public keys; add them with [Add] in the [Add/Update SSH Keys] window and tell them apart by their [Label] names.
Change them with the pencil icon next to Username and Password in [Master Credentials]. Afterwards, enter the new values in the connection details saved in FileZilla and your SSH program as well.
After a blank line, [Login incorrect] appears and you are back at the [login:] prompt. Start again with the Username; the password cannot be pasted, so type it.
☁️Recommended Cloudways content21 Posts · 2 Tools
🗂️ Running Cloudways
📄 What Is Cloudways📄 Signup and basic setup📄 Domain connection📄 SSL setup
📋 Server & Application📄 Admin login📄 Staging Management📄 Billing · Pricing📄 Email · SMTP add-on📄 MCP · AI Server Management📄 SFTP and SSH Access📄 Migration📄 Backup📄 Vertical Scaling
📋 Hosting Comparison Top 7📄 What is cloud hosting📄 What is managed hosting📄 Web Hosting Costs📄 Cloudways for Small Businesses📄 Cloudways WooCommerce📄 Cloudways Alternatives
ℹ️ Affiliate Disclosure This site's content contains affiliate links. When a visitor buys a product or service through one of them, the site receives a commission from the seller. The amount the buyer pays(it goes down during event discounts ↓)does not go up. Posted prices, discounts, and stock reflect the time of writing and may differ, so confirm with the seller before buying. Products are chosen and reviewed by our own standards, and commissions do not affect the order or content of reviews.